How to plan a solo hiking trip across the Swiss Alps
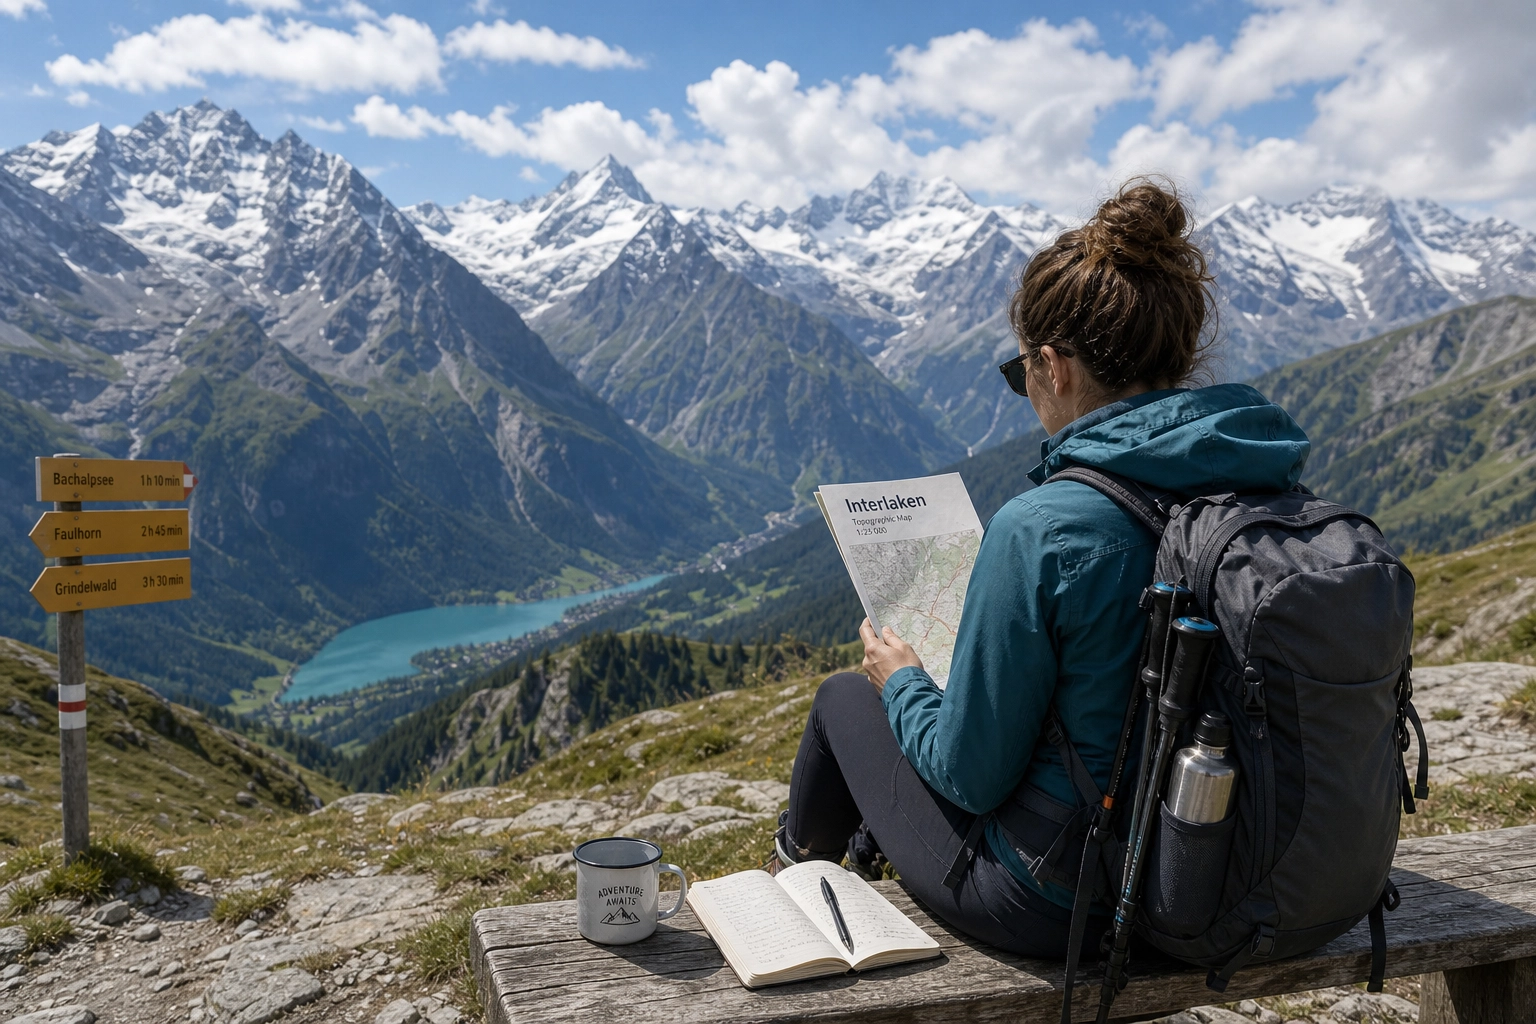
Booking a flight to Geneva or Zurich is the easy part. The real challenge of planning a solo hiking trip to Switzerland hits the moment you open the SBB (Swiss Federal Railways) app and look at a map. You are immediately confronted with a spiderweb of funiculars, cogwheel trains, post buses, and cable cars.
Then, you check the prices. A standard hotel room in a mountain village can easily exceed 200 CHF a night. A single cable car ride to a trailhead might cost 45 CHF. Suddenly, the dream of wandering the Alps solo starts to feel like a logistical and financial nightmare.
But Switzerland is arguably the most accessible and rewarding alpine environment in the world for solo backpackers—if you bypass the traditional luxury hotel route and utilize the country’s highly efficient network of mountain hostels.
By treating specific hostels as strategic “basecamps” rather than just cheap beds, you can drastically cut costs, find hiking partners instantly, and access world-class trails without having to carry a heavy 50-liter backpack over mountain passes every single day.
This guide breaks down exactly how to structure a solo hiking trip in the Swiss Alps, compare the best hiking hostels, manage the complex transportation network, and decide between a DIY itinerary and an organized group package.
The Solo Hiker’s Dilemma: Logistics vs. Experience
Solo hikers in Switzerland generally face three major friction points:
- The Loneliness Factor: While solitary time in nature is great, tackling exposed alpine ridges or complex navigation alone carries higher risks. Furthermore, sharing a beer and swapping trail stories after a 15-kilometer hike is a core part of the alpine experience.
- The Cost of Moving: Traditional point-to-point hiking means paying premium prices for mountain huts or moving between expensive valley hotels. You are also forced to eat at high-altitude restaurants.
- Transit Friction: Syncing a train to a bus to a cable car just to reach a trailhead requires meticulous daily planning.
To solve this, experienced backpackers abandon the romanticized idea of walking continuously from town to town. Instead, they use the Basecamp Strategy.
The Basecamp Strategy Explained
The basecamp strategy involves booking 5 to 7 nights at a single, well-connected hostel in a valley hub (like Interlaken, Liddes, or St. Stephan). Because Swiss public transit is integrated and highly punctual, you can wake up at your hostel, take a 30-minute train ride to a high-altitude trailhead, hike an epic 12-mile loop, and return to your hostel by dinner.
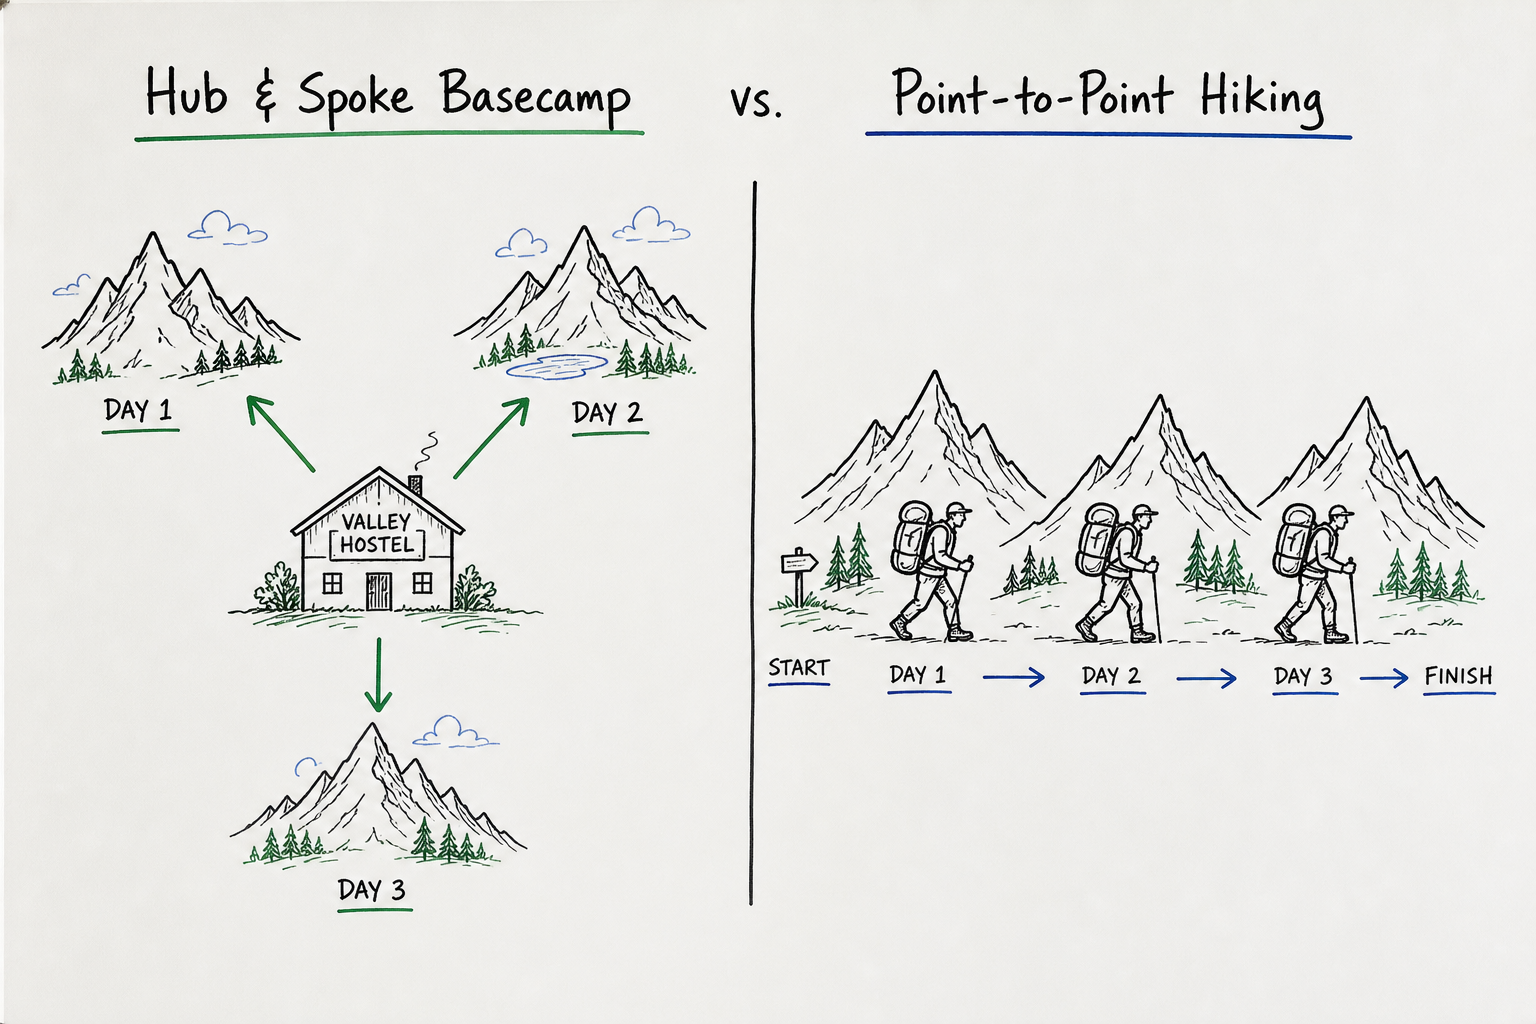
This approach offers massive advantages for solo travelers:
- You hike with a daypack: You leave your heavy luggage secured in your hostel locker. Hiking with a 20-liter daypack instead of a 60-liter expedition pack makes steep ascents infinitely more enjoyable.
- Weather flexibility: If a thunderstorm hits the high peaks, you aren’t stuck at a remote mountain hut. You can pivot and hike a lower valley trail, or visit a nearby city.
- Access to supermarkets: Valley hostels usually have guest kitchens and sit near Coop or Migros supermarkets. Cooking your own dinners saves roughly 30-50 CHF per day.
- Instant community: When you stay at a basecamp hostel, you repeatedly see the same hikers in the common areas, making it incredibly easy to form groups for the next day’s trail.
If you want to understand why traditional alpine lodging is losing ground to this model, read about Hotels in Swiss Mountains? Why Social Lodges Beat Luxury.
Top Regions and Best Hiking Hostels for Solo Backpackers
When choosing your basecamp, location is everything. A cheap hostel is useless if it requires two hours of expensive transit just to reach the mountains. The two best approaches for solo hikers are the DIY hubs (primarily in the Bernese Oberland) and the Organized hubs (in Valais and the broader western Alps).
1. The Bernese Oberland (Interlaken & Surrounds)
Interlaken is the undisputed king of DIY backpacker hubs in Switzerland. Situated between Lake Thun and Lake Brienz, and sitting directly at the foot of the Jungfrau region, it provides unparalleled access to famous trails in Lauterbrunnen, Grindelwald, and Zermatt.
For solo travelers organizing their own trips, the hostel infrastructure here is world-class.
Backpackers Villa Sonnenhof (Interlaken)
Often ranked as one of the best hostels in Europe, Sonnenhof is arguably the premier solo backpacker basecamp in Switzerland.
- Why it works for hikers: It offers direct walking access to trains heading into the Lauterbrunnen valley. They provide free local transport tickets, breakfast is included (essential for early alpine starts), and they have a dedicated drying room for wet hiking boots and rain jackets.
- The Vibe: It strikes a perfect balance. It is incredibly social, with daily events and a strong solo-traveler community, but it avoids the chaotic party atmosphere that keeps serious hikers awake at 2 AM.
Balmers Hostel (Interlaken)
Balmers is legendary on the European backpacking circuit. It leans heavily into the social and adventure sports scene.
- Why it works for hikers: If you are a solo traveler terrified of being alone, you will find an instant friend group here. The staff are heavily connected with local adventure guides and can help organize canyoning, paragliding, and group hikes.
- The Vibe: High energy. It’s ideal for younger backpackers or those who want an aggressive mix of daytime mountain exertion and nighttime partying. If you need a strict 9 PM bedtime before an alpine ascent, this might not be your first choice.
Adventure Hostel (Interlaken)
A slightly more subdued alternative to Balmers, offering stunning views of the Eiger, Mönch, and Jungfrau right from the property.
- Why it works for hikers: It naturally filters for an outdoors-focused crowd. The common areas are usually filled with people poring over SwissTopo maps rather than doing shots. It’s an excellent environment for finding serious hiking partners.
For a deeper dive into stretching your budget in this region, check out 7 Tips for Hiking in Switzerland (Without the High Cost).
2. Valais, Liddes, and St. Stephan (The Organized Approach)
While Interlaken is great for DIY travelers, the sheer volume of choices and the mental load of organizing daily transport can be exhausting. Many solo hikers, digital nomads, and budget-conscious outdoor travelers are shifting toward organized, week-long hostel packages.
This is where regions like Valais (specifically hubs like Liddes) and the Simmental valley (St. Stephan) shine. These areas are slightly removed from the hyper-crowded Jungfrau tourist zones, offering a more authentic alpine experience.
The Hiking Hostel Model
Instead of booking a bed and figuring out the rest yourself, the modern organized hiking holiday bundles the entire experience for solo travelers. A basecamp at a dedicated hiking hostel in Liddes or St. Stephan provides:
- Zero-Logistics Hiking: Daily trail transport is handled for you. You don’t have to decipher bus schedules or worry about missing the last cable car down the mountain.
- Built-in Social Group: Because everyone books a week-long package, you hike, eat, and socialize with the same cohort of 10-20 like-minded travelers all week. You never have to awkwardly ask to join a group; you are already in one.
- Strategic Excursions: From these hubs, organized transport can efficiently drop you at iconic trailheads across different regions, including excursions to Aosta in Italy, the Chamonix/Mont Blanc region in France, and Glacier 3000 or Gstaad.
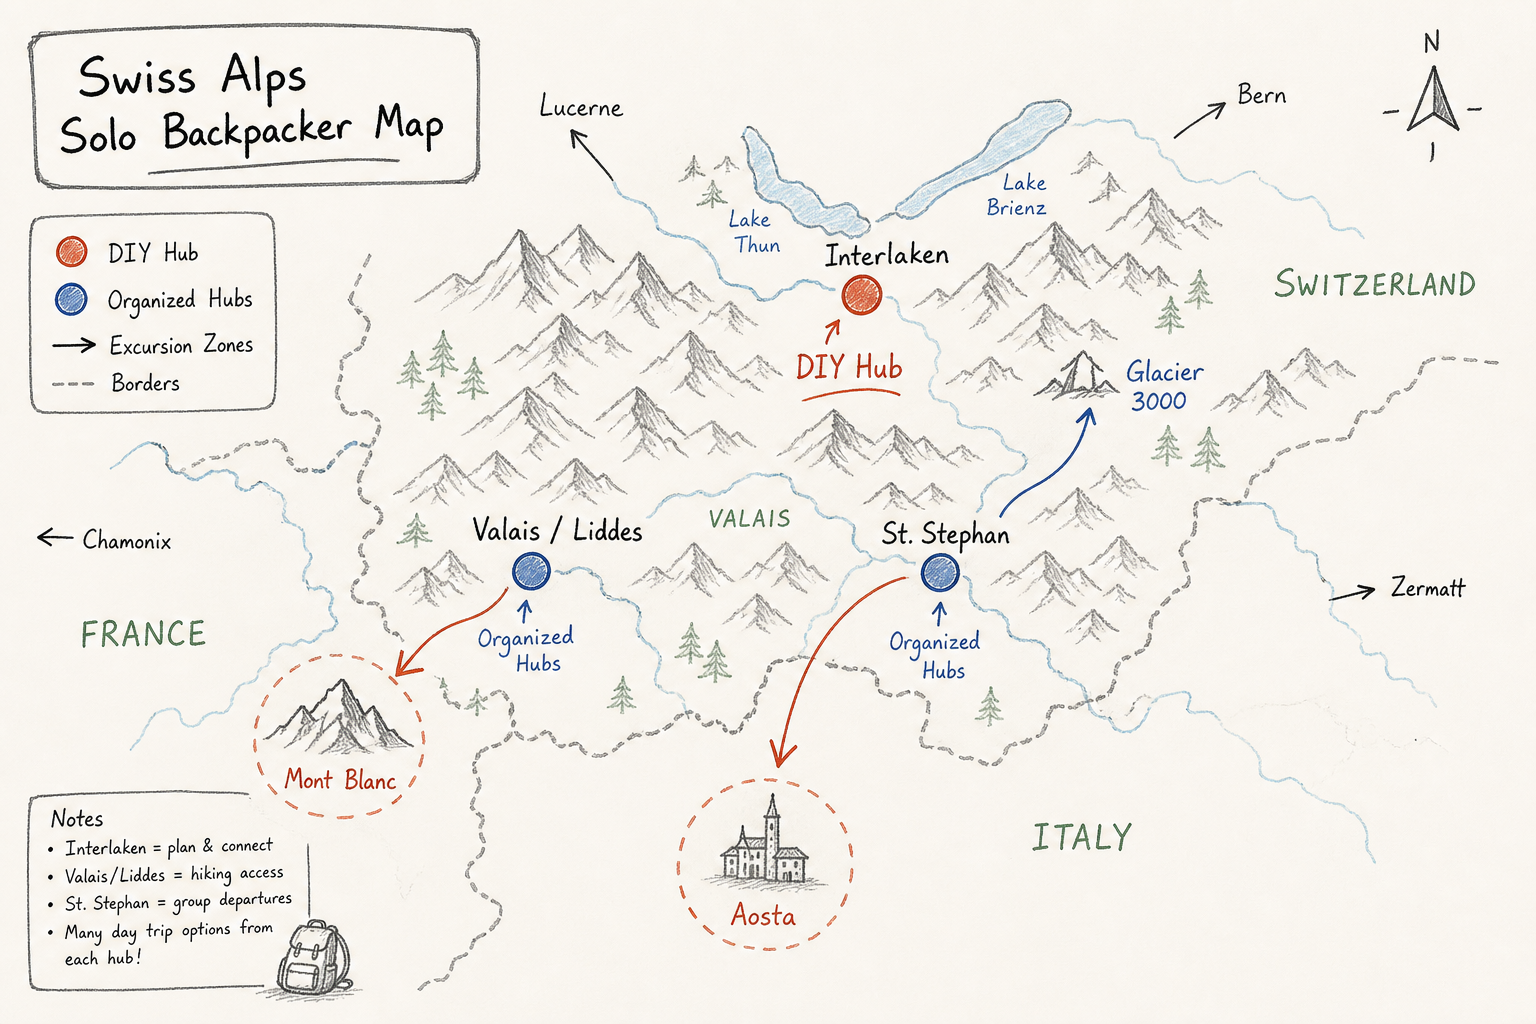
If you want to hike iconic routes without navigating the crowds blindly, accessing the Mont Blanc massif from a Swiss basecamp is highly effective. Read more on Mountain Mont Blanc: 7 Ways to Visit Without the Crowd.
Basecamp Hostels vs. Hut-to-Hut Hiking
A common debate for solo travelers is whether to stay in valley hostels or attempt a hut-to-hut trek (like the Walker’s Haute Route) using SAC (Swiss Alpine Club) mountain huts.
Mountain huts are incredibly romantic. They are perched on the edges of glaciers and offer unparalleled sunrises. However, for a solo backpacker, they present several distinct challenges compared to a basecamp hostel:
1. The Cost Barrier
An overnight stay in a Swiss mountain hut with half-board (dinner and breakfast) typically costs between 75 and 100 CHF per night, even with an Alpine Club membership. You cannot cook your own food in a hut. A valley hostel costs 35-55 CHF, and cooking your own food brings your daily total to significantly less than a hut stay.
2. Booking Inflexibility
Mountain huts require reservations months in advance, especially on popular routes. If you wake up and your knee hurts, or there is a torrential downpour, you cannot simply skip a day. You lose your deposit, and your entire multi-day itinerary breaks. Hostels allow you to take a rest day without derailing a continuous route.
3. The Weight Penalty
Moving hut-to-hut requires carrying a larger pack. Even though you don’t need a tent, you still must carry a sleeping liner, all your clothing, emergency gear, toiletries, and extra water over high-elevation passes every day.
For a complete breakdown of when huts make sense, read How to Plan Hut to Hut Hiking in Switzerland (7 Tips).
Designing Your Itinerary: DIY vs. Organized Packages
To understand the difference in the daily flow of a solo hiker, let’s compare a DIY trip based in Interlaken versus a week-long organized package based in St. Stephan or Liddes.
Scenario A: The DIY Interlaken Itinerary
- 06:30: Wake up in a 6-bed dorm. Try to pack your daybag quietly without waking others.
- 07:00: Eat the hostel breakfast. Strike up a conversation with two backpackers to see if they want to hike the Schynige Platte.
- 08:15: Walk to Interlaken Ost station. Queue to buy a ticket (or navigate the SBB app to ensure your Half Fare Card is applied correctly).
- 09:00: Take the train to Wilderswil, then transfer to the historic cogwheel train up to Schynige Platte.
- 10:00 - 15:00: Hike the breathtaking route to First.
- 15:30: Arrive at First. Realize you missed the last discounted cable car. Pay full price for the descent to Grindelwald.
- 16:30: Take the train from Grindelwald back to Interlaken.
- 18:00: Walk to the Coop supermarket to buy pasta, sauce, and cheap beer.
- 19:00: Fight for stove space in the crowded hostel kitchen.
The Verdict: Incredibly rewarding, but mentally taxing. You are serving as your own travel agent, navigator, and chef every single day.
Scenario B: The Organized Package Itinerary
- 07:30: Wake up. Head down to the hostel dining room where a massive breakfast spread is already prepared.
- 08:00: Sit with the same group of solo travelers you met on Monday. The group leader briefs everyone on today’s excursion to Glacier 3000.
- 08:45: Board the private hostel shuttle. No train schedules to check, no tickets to buy.
- 09:30: Arrive at the trailhead. Hike a stunning route with your new friends.
- 15:00: The shuttle is waiting at the end of the point-to-point trail (no need to hike a loop just to get back to a train station).
- 17:00: Return to the basecamp hostel. Shower, grab a drink in the lounge.
- 19:00: Sit down for a family-style group dinner prepared by the hostel staff.
The Verdict: Maximum trail time, zero logistical friction. This is why Guided Hiking in Switzerland: Finding Your Social Group has become the preferred method for digital nomads and time-strapped professionals who want the hostel vibe without the hostel hassle.
Navigating the Swiss Public Transit System (DIY Hikers)
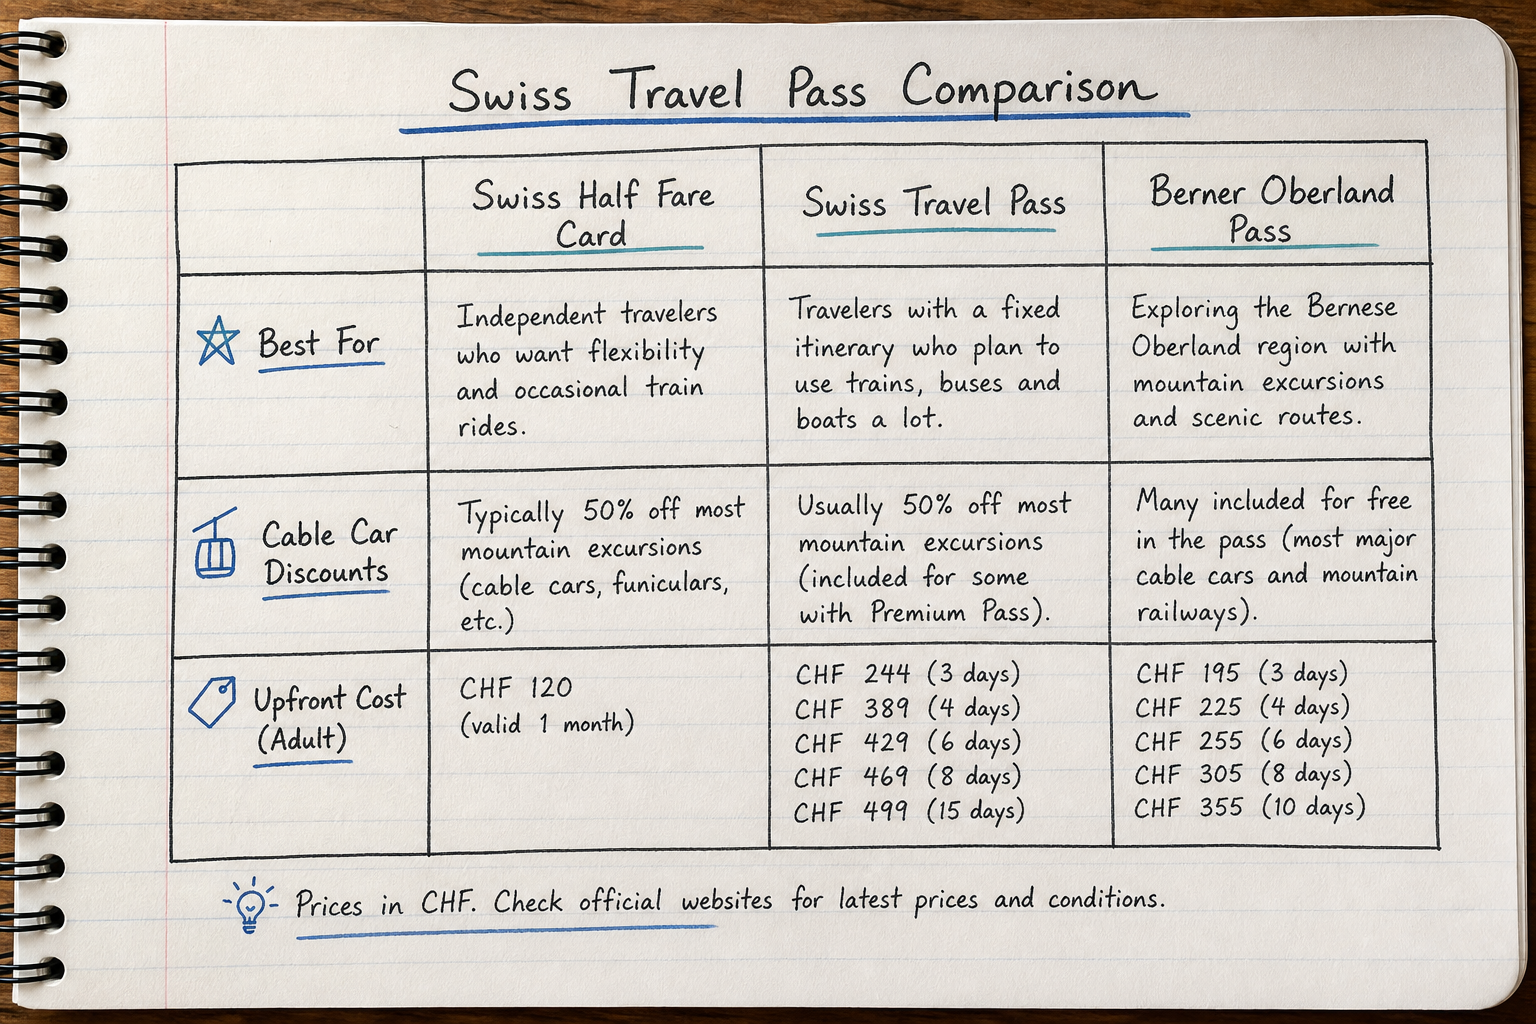
If you choose the DIY route, mastering the Swiss transport system is non-negotiable. It is brilliant, punctual, and ruinously expensive if you don’t buy the right pass.
As a solo hiker, you have three primary options for reducing travel costs:
1. The Swiss Half Fare Card
This is usually the mathematical winner for hikers. For a one-time fee of 120 CHF (valid for one month), you get 50% off almost all trains, buses, boats, and—crucially for hikers—cable cars and mountain railways. If you plan to take more than two major cable cars during your trip, this card pays for itself.
2. The Swiss Travel Pass
This offers unlimited travel on trains, buses, and boats for a set number of consecutive days (e.g., 8 days for ~389 CHF).
- The Catch: It only gives a 50% discount on most mountain cable cars (and only 25% on the Jungfraujoch). If your primary goal is hiking high up in the mountains, you are paying a massive premium for unlimited valley trains you aren’t using.
3. Regional Passes (e.g., Berner Oberland Pass)
If you base yourself strictly in Interlaken or Grindelwald, a regional pass gives you unlimited access to almost all trains, buses, and cable cars within that specific zone. This is excellent for flexibility, allowing you to hop on and off gondolas at whim.
Essential Gear: Packing for a Swiss Hostel Trip
Packing for a hostel-based hiking trip is distinct from packing for a wilderness backpacking trip. You don’t need a tent, sleeping pad, or camp stove. However, you do need a mix of technical alpine gear and practical communal-living items.
Keep your main luggage to a 40-45L travel backpack (like an Osprey Farpoint), and bring a packable 20-25L daypack for the actual hiking.
The Trail Kit (Inside your 20L Daypack)
- Waterproof Shell: Mountain weather is volatile. A bright, sunny morning in the valley can turn into a violent hail storm at 2,500 meters by 2 PM.
- Mid-layer Fleece or Puffy: Temperatures drop rapidly as you gain elevation.
- Sturdy Trail Runners or Hiking Boots: The trails are well-maintained, but steep and rocky. Trail runners (like Altra or Hoka) are increasingly popular, but boots provide better ankle support on scree.
- Trekking Poles: Essential for saving your knees on 1,500-meter descents.
- First Aid Kit & Blister Tape: Swiss pharmacies are expensive. Bring Compeed blister patches from home.
- Physical Map / Offline Map App: Download routes on SwissTopo (the gold standard for Swiss maps) or AllTrails.
The Hostel Kit (Inside your 40L Main Pack)
- Padlock: For securing valuables in dorm lockers.
- Microfiber Towel: Many hostels charge 3-5 CHF to rent a towel.
- Earplugs and Eye Mask: The ultimate defense against snoring roommates and early risers.
- Power Bank: High-altitude cold drains phone batteries quickly.
- Shower Shoes: Basic flip-flops for communal bathrooms.
- Lodge Clothes: Comfortable, clean clothes to change into after a shower. You do not want to sit in the dining room in your sweaty hiking gear.
For a highly specific breakdown of layering and summer gear, read our Swiss Alps Summer: A Simple 5-Step Packing Guide.
Decoding Swiss Trail Signs: Safety for Solo Hikers
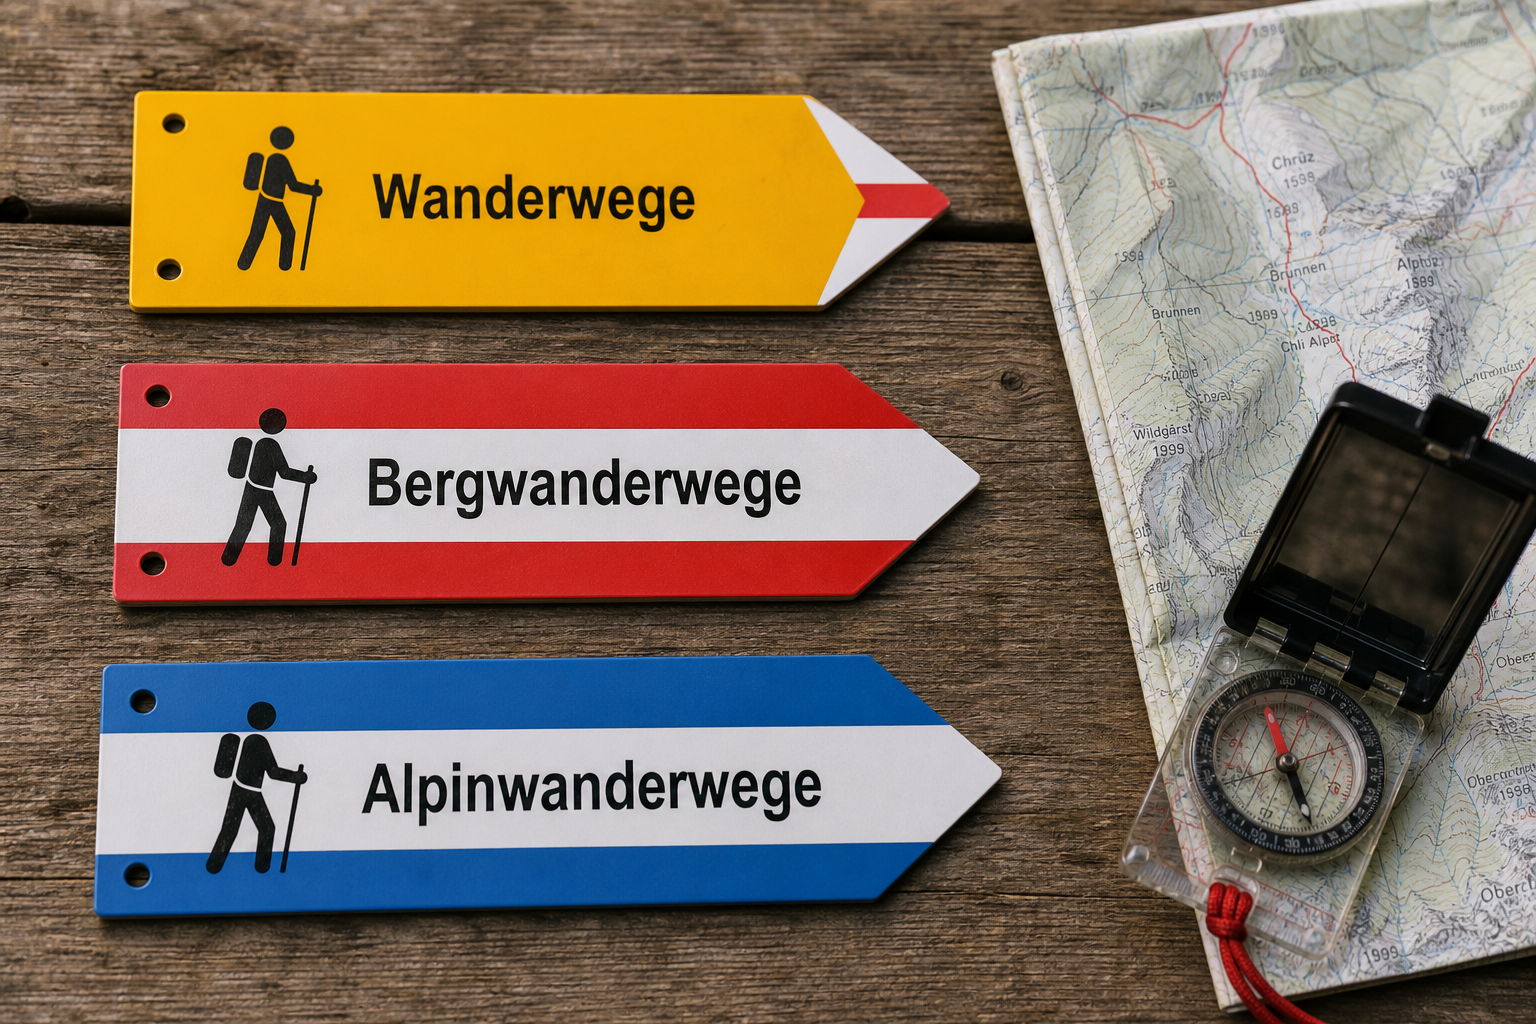
One of the greatest comforts of hiking in Switzerland is the meticulous signage. As a solo traveler, knowing how to read these signs is your primary safety tool. You will rarely get lost if you understand the color-coding system.
Yellow Signs (Wanderwege)
These are standard hiking trails. They are generally wide, relatively flat, and require no special equipment. You can walk these in sturdy sneakers. They often connect villages or follow valley floors.
Red-White-Red Signs (Bergwanderwege)
These are mountain trails. They are steep, uneven, and often exposed. You need proper hiking boots or trail runners with aggressive grip. You should have a reasonable level of fitness and be prepared for sudden weather changes. Most of the famous “epic” hikes in Switzerland fall into this category.
Blue-White-Blue Signs (Alpinwanderwege)
Solo hikers must treat these with extreme caution. These are alpine routes. They frequently involve crossing snowfields, navigating scree slopes, and scrambling over rocks using permanently fixed cables or ladders. Do not attempt these alone unless you are a highly experienced alpinist comfortable with exposure.
General Solo Safety Protocols
- The Golden Rule: Always tell the hostel reception or a roommate where you are going and what time you expect to be back.
- Download the REGA App: REGA is the Swiss air rescue service. Their app allows you to trigger a rescue and broadcasts your exact GPS coordinates to their helicopters. (Note: Ensure your travel insurance covers helicopter rescue, or become a REGA patron for 40 CHF a year).
- Check MeteoSwiss: Do not rely on Apple Weather. Download the MeteoSwiss app and check the precipitation radar immediately before starting your hike.
Beyond Switzerland: Excursions from your Basecamp
One of the strategic advantages of choosing western Switzerland (like Valais or the St. Bernard Pass area) as your basecamp is proximity to international borders.
If you book a week-long package at a hub like Liddes, you aren’t confined to Swiss trails. Organized excursions frequently cross into France and Italy.
For example, you can take a day trip to hike the stunning Italian side of the Alps. While many associate this region with winter sports—as detailed in Skiing in the Italian Alps? Try This Aosta Day Trip—the summer hiking around Gran Paradiso National Park near Aosta is spectacular and noticeably cheaper for mid-hike espresso and lunch than the Swiss side.
Similarly, access to the Chamonix valley allows you to witness the dramatic glaciers of the Mont Blanc massif before retreating to the quieter, more affordable Swiss side for the evening.
Building a Hiking Community on the Trail
If you opt for the DIY hostel route (rather than a pre-packaged group week), you will need to put in a little effort to find trail partners. Hiking alone is great, but having someone to share a celebratory Rivella (the local Swiss soda) at a mountain restaurant is better.
Here are the most effective ways to build a group as a solo traveler:
- The Hostel Kitchen: Offer to share ingredients. Splitting the cost of a pasta dinner is the easiest icebreaker in hostel history.
- WhatsApp Groups: Many social hostels have a QR code at reception linking to a guest WhatsApp group. Drop a message: “Hey, I’m heading to Oeschinensee tomorrow morning on the 08:00 train. Anyone want to join?”
- Cross-Discipline Networking: Don’t just look for hikers. Often, mountain bikers and climbers have rest days and want to do a scenic walk. The principles for finding groups are universal—see our guide to Find the Right Mountain Bike Group for Alpine Trails for networking tactics that apply perfectly to hikers as well.
Frequently Asked Questions for Solo Backpackers
When is the best time to plan a hostel hiking trip in Switzerland?
The primary hiking season is short. Mid-July through mid-September is the optimal window. In June, many passes over 2,000 meters are still blocked by snow, and cable cars may be operating on limited schedules. By late October, the first snows begin to fall, and hostels shift their focus to winter ski crowds.
How much budget do I need for a week in a Swiss hostel?
If you do it strictly DIY, budget around 35-50 CHF per night for a dorm bed. Expect to spend 20-30 CHF a day on groceries if you cook all your meals, and 20-40 CHF a day on transportation (assuming you have a Half Fare Card). A highly frugal solo traveler can survive on 90-110 CHF a day. Alternatively, an all-inclusive week-long hostel package offers predictable pricing upfront, removing the daily stress of nickel-and-diming your budget.
Do I need a mountain guide?
For standard red-white-red alpine trails, no. The paths are well-marked. However, if you want to attempt glacier crossings (like portions of the Glacier 3000 region) or summit technical peaks, a guide is mandatory. For most solo travelers, joining an organized hostel package provides the perfect middle ground: you get trail advice, route planning, and group security without the massive expense of hiring a private UIAGM-certified mountain guide.
Is Switzerland safe for solo female hikers?
Extremely. Switzerland consistently ranks as one of the safest countries in the world. Violent crime is exceptionally rare. The primary dangers in Switzerland are environmental (weather, altitude, and trail conditions), not human. Hostels are generally very respectful, and many offer female-only dormitories.
Finalizing Your Alpine Strategy
Successfully hiking the Swiss Alps solo doesn’t require a limitless budget or the willingness to carry a brutal 60-liter pack over mountain passes for weeks on end.
By leaning into the basecamp strategy, you unlock the best of both worlds. Whether you choose the hyper-social DIY hub of Interlaken, or the stress-free, community-driven week-long packages in Valais and St. Stephan, utilizing Switzerland’s hiking hostels is the key to turning a daunting logistical puzzle into the greatest outdoor adventure of your life.
Choose your region, book your basecamp, pack your layers, and let the Swiss transit system do the heavy lifting while you enjoy the views.